Starting An Electrician Business

Electrical Work Pricing Guide

The average cost to hire an electrician to install or repair light fixtures, outlets, switches, or fans ranges from $141 to $419. Wiring costs $6 to $8 per foot and upgrading an electrical panel costs $1,100 to $2,500. Get free estimates from electrical services near you or check out our electrician prices list below.

Electrical Work & Repair Costs

The average cost to hire an electrician to install or repair light fixtures, outlets, switches, or fans ranges from $141 to $419 with homeowners spending $280 on average. For larger electrical jobs like installing wiring or replacing an electrical panel, expect to pay $2,000 to $6,000.

Electrician Cost

The average cost of an electrician is $40 to $100 per hour, with a typical call-out fee or first-hour rate of $75 to $125. To hire a master electrician for specialty work, expect to spend $150 for the first hour, with an average hourly rate of $100 to $120

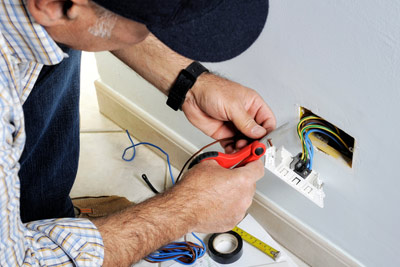
Most homeowners will call an electrician when too much or too little power is coming to outlets or lighting fixtures (tripping circuit breakers), they need more or safer outlets installed, or the wiring needs upgrading because the house is old and the old wiring isn’t up to par. Most electricians’ charge by the hour and costs are based on the electrician’s experience, what your electrical needs are, and the complexity of the job.

Apprentice Electrician – Is usually in school and they are just starting their electrical career.

Journeyman Electrician – Has completed the first phase of education and is allowed to work independently.

Master Electrician – Has completed their education and has several years of work experience and is a master of the trade

Electrician Prices List

While it can be a relatively quick job for an electrician to fit an outlet or wire your surround sound system, the bulk of your cost lies in the electrician’s service call fee of about $75, so it may cost about $125 to $150 for a small job like installing or replacing an outlet. Larger jobs such as wiring and circuit breaker installation run $2,000 or more.

Best Electrician Books for Beginners

A good electrician’s book can easily be the difference between passing or failing an exam. Look for a book that has NEC tables, detailed information on wiring, and a reference table for common equations and unit conversions.

First on our list is Ugly’s Electrical References. It was updated in 2020, and this is by far the best Ugly’s guide out. Its main purpose is to teach new and professional electricians the ins and out of the industry. For instance, it can be used as a reference while on the job and can answer the questions that most beginners and apprentices tend to have.

This book presents the most important information electricians need at their fingertips such as National Electrical Code tables, mathematical formulas, conduit bending, voltage drops, first-aid procedures, and wiring.

For those that are undergoing electrician apprenticeship training, this is the right book for you. It includes charts to help you determine the right wire to use for a circuit. This helps you prevent house fires by using the wrong wire.

Another reason why consumers like this book are the quality of the information presented. It is compact and includes tables for electrical construction and commonly used electrical formulas. So, you won’t have any problem finding information based on your electrical project.

How much do electricians cost?

Electricians keep the power running to our homes and mean we can enjoy everything from our TVs to toasters. Keeping the electrics in our home running properly is a matter of safety, and if you need to update anything in your home, or make any changes, then it’s important you hire the right person and have the done carried out properly.

Jobs of all sizes

If you’re thinking about having some electrical work done, whether that’s adding a new plug socket or getting your fuse box replaced, you’ll want to know what kind of costs will be involved.

What is the hourly rate of an electrician?

Electricians can charge in one of two ways – either a fixed fee for a particular job, or an hourly rate that will cover whatever they have to do within a certain space of time. Generally, most electricians will prefer to price for a specific job, but an hourly rate gives a good benchmark of costs.

Have found that an average hourly rate is about $40 per hour, though this can be more or less in different parts of the country, with London and the south-east tending to be more expensive.

If a job is likely to take an entire day or more, an electrician might prefer to set a day rate, which may be around $200 or $250. The first hour will often be more expensive than subsequent hours as any travel time and taxes will be factored into this.

Sales Tax Guide for Electricians

This guide provides some general information on tax issues specific to electricians and resources for registering, filing returns and making payments. It is not intended to be used as a legal ruling, but merely as a general guide for sales and use taxes as they relate to electricians. Not every tax situation is covered in this guide

Generally, electricians act as contractors when they perform:

Construction

Reconstruction

Alteration

Improvement

Remodeling or

Repair of real property

and are the consumers of tangible personal property (material) purchased by them for the performance of their contracts. In these instances, they are required to pay sales or use tax as consumers on the total price of the material purchased at the time of purchase, unless the purchase is exempt from tax.

There are several exemptions from tax that may apply depending on whether the material is:

Purchased for an entity that is exempt from tax or

Used in an exempt manner.

If an electrician doesn’t pay sales tax at the time of sale and the material is subject to tax, the electrician must:

Self-assess a use tax on the cost of the material and

Remit the tax to the Department of Revenue (DOR).

Where an electrician agrees to sell material and provide installation services for a separate price, the electrician is:

Acting as a vendor and

Required to collect the sales tax based on the price the electrician charges their customer. 

Exceptions

There are exceptions when electricians:

Perform contracts for organizations that are exempt from sales tax under G.L. c. 64H, Section 6(d) and/or Section 6(e).

Purchase material(s) that are used in an exempt manner from sales tax under G.L. c. 64H, Section 6(r) and Section 6(s).

How To Become An Electrician

We have all the info you need to start a successful and high-paying career as an electrician. We’ve got:

A step-by-step guide on how to become an electrician;

A complete list of schools and apprenticeships in your state; and

Info on what it’s actually like to be an electrician—salary, hours, work environments, and so on.

Begin An Electrician Career In Steps

We promised a step-by-step guide on becoming an electrician, so let’s get to that first. Here’s the process you’ll follow to become a licensed electrician, boiled down to three steps.

You will need to:

Learn about the different types of electrician careers (we discuss each type in a section below), and get a feel for the type of electrical work you’d like to do

Find an electrical apprenticeship, either through a technical school, union, or employer, OR enroll in an electrician program at a trade school or community college, find a job after graduation, and then begin accruing the necessary work experience to…

Take your state or municipality’s licensing test and become a journeyman electrician. Easy as one-two-three, right?

Let’s take a look at what electricians actually do, figure out what kind of electrician you want to be, find out how much you can expect to make (some good news: it’s a lot), and then go into more detail about each of the three steps.

Home Inspection Their Purpose And Process

Are Virtual Inspections in Your Future?

Fast-forward to late March 2020 and the onset of stay-at-home orders in light of the Coronavirus health crisis across most of the country, and that tune changed dramatically.

Keeping Residential Construction on Schedule

Nationwide, nearly 90% of residential construction work has been allowed to continue as an “essential” industry, but delays in getting necessary inspections to maintain progress has been slowed by social distancing and other health-related measures.

Virtual building inspections (VBIs) seemed like a logical solution, but that option was only available to about 4% of builders before the pandemic, according to a recent NAHB survey; since then, another 20% of municipalities have introduced some form of the technology (usually via FaceTime, Zoom, or a similar mobile device app), but that still leaves 75% of the industry waiting for in-person inspections.

had been thinking about offering virtual inspections for a few years and had conducted a couple of test runs of an in-house solution in the months before COVID-19. But when his office was forced by the state to close on March 18

The program uses a mix of relatively low-tech audio-video solutions, such as Microsoft Teams and Google Duo, to allow inspectors to work remotely and communicate effectively with contractors in the field.

Most Common Defects Found in Home Inspections

Nearly 55 percent of homes analyzed across the country had doors that needed adjusting, which could be an indicator of foundation issues, the report showed. More than half—or 54 percent—of the homes lacked exterior caulking and sealant, which could leave the home susceptible to extensive water damage. Furthermore, about 48 percent of homes lacked GFCI protection—this could pose a dangerous electrocution risk to homeowners around water-prone areas like the kitchen or bathroom.

“Home buyers and [real estate professionals] across the country should leverage these insights to better position themselves in the stressful negotiation process,”

for example, buyers may only be given three to five days to complete the inspection period, meaning they may only have 24 hours or less to make a decision. During this period, having clarity and insight into the cost of repairs listed in a home inspection report is critical to avoid leaving money on the table.”

The most expensive home defects—uncovered in 9 to 20 percent of the homes studied—ranged in repair prices from slightly more than $1,000 to less than $10,000.

Transaction Guidance During COVID-19

This is general guidance only. Members should consult their brokers, legal counsel, and government-provided public health information. In addition, check with your MLS for any changes to open house and showing fields, or other temporary rules in place due to local conditions.

In deciding how to address new issues that may come up in your day-to-day business, we urge you to find answers that will ensure first-class services to your clients, while also demonstrating care for the health and well-being of clients, agents, and the greater public welfare in reducing the risk of exposure to and spread of COVID-19.

My seller doesn’t want any showings, what should I do?

A seller generally has control over how their property is shown and has agreed to certain marketing activity in the listing agreement. If the seller desires to prohibit in-person showings, get those instructions in writing and consider an addendum to your listing agreement to extend the listing.

May I limit in-person showings to pre-qualified buyers?

Yes. Both listing and buyer’s agents may ask if a buyer is pre-qualified to purchase and limit showings to qualified buyers. Be sure to ask all buyers for a pre-qualification letter to avoid a potential Fair Housing violation. Keep in mind that it may be difficult for buyers just entering the market to obtain a pre-qualification letter given the current circumstances, as many mortgage companies have been impacted by the pandemic with high volumes of refinancing applications and other operational issues.

May an agent require an individual complete a COVID-19 screening questionnaire before showing an individual a property?

Yes, it is reasonable to screen individuals for COVID-19 prior to showing an individual a property, but be sure to require all individuals to complete the questionnaire to avoid fair housing issues.  Keep in mind that self-reporting may provide limited assurance, as some individuals with the virus are asymptomatic or do not realize they have symptoms. Therefore, even where a COVID-19 screening questionnaire is used, agents should be sure to take additional precautions, and continue to follow the CDC’s recommendations, including social distancing (maintaining a distance of 6 feet or more between individuals), requiring guests to wash their hands or to use an alcohol-based sanitizer immediately upon entry, and removing shoes/covering with booties, to avoid exposure to, and spread of, COVID-19. 

Coronavirus and Appraisers: Your Questions Answered

In response to the growing concerns about COVID-19, commonly referred to as coronavirus, The Appraisal Foundation is providing this assistance to help Appraisers respond to the coronavirus’s potential impact on the profession. Most important is to stay up to date on developments as they are occurring rapidly. The Center for Disease Control and Prevention is providing daily, even hourly updates.

My state has declared a lock down for all non-essential services. Are appraisers in my state defined as an a non-essential service or an essential service?

Your state appraisal regulator is in the best position to answer this question. The Appraisal Subcommittee has contact information for all state regulators on its website

The U.S. Department of Homeland Security issued guidance that recognizes “Residential and commercial real estate services, including settlement services” as being part of the “Essential Critical Infrastructure” workforce

Will the continuing education cycle be extended and will distance education be expanded?

The Appraiser Qualifications Board and the Appraisal Subcommittee are working together to offer relief wherever possible during this unprecedented national emergency.

Appraisal Standards Board

The ASB provides updated guidance on interior inspections during a national health emergency. In addition, the ASB has issued guidance on completing  a desktop  or exterior-only appraisal, but reporting the results using a GSE form designed for an appraisal with an interior and exterior inspection.

How Much Does a Home Inspection Cost?

How much does a home inspection cost? According to the U.S. Department of Housing and Urban Development, a typical home inspection costs $300 to $500. In most cases, it’s well worth it for buyers to hire a home inspector.

Home inspections, for you first-time home buyers out there, are a way to vet a home before you buy it. Let’s face it: Buying a home is a huge investment—and you can’t exactly read reviews to get a sense of any problems that might crop up after you’ve plunked down your money for the purchase price.

How much does a home inspection cost?

While the average home inspection costs for a single-family home will generally run $300 to $500, just keep in mind that the exact price will depend on the size of your home, where you live, and what you want inspected

An older home may also cost more to inspect. Or a home inspector may need to spend more time on a house with apparent defects, which may cost you more.

What home inspectors look for

A professional home inspector, certified by the NAHI, is trained to use a home inspection checklist to look at over 1,600 features of your home that can fall into disrepair (who knew there were so many?).

Water Testing Methods: Detecting Salt Levels In Fluids, Food Items

Pool Water Testing Is Essential to Pool Health

We simply can’t stress enough how important it is to regularly test your pool water early and often. After all, a personal home swimming pool is a major investment, so why not take all of the necessary precautions to ensure the long term health of your pool?

How to Test Pool Water Accurately

  • Get a clean container for the sample (depending on the type of testing equipment you are using, this may be provided).
  • Flip the container upside down, with the mouth of the container open toward the ground.
  • Find an area of your pool away from return jets or the pool skimmer—preferably in the dead center of your pool.
  • Submerge the container into the water until the water comes up to your elbow.
  • Flip the container right-side-up, which will let the water into the container, collecting the sample.

Filters Keep Things Clean

The job of the filtration system is to remove any undissolved dirt and debris from the pool water. There are three types of swimming pool filters:

Sand Filters – Inexpensive and easy to operate, sand filters remove dirt and debris through a process called “backwashing,” which basically means flipping a switch to reverse the water flow. All you have to do is check the filter’s pressure gauge. If the gauge indicates a 7- to 10-pound increase over normal operating pressure, it’s time to backwash.

A few things to keep in mind if you’re considering a sand filter:

  • Sand filters are more efficient when they are slightly dirty, which means you shouldn’t backwash more than necessary.
  • Sand filters should be cleaned at least every season with a filter cleaner.
  • You should completely replace your filter sand every five years or so.

Cartridge Filters – Although a cartridge filter costs a bit more upfront than a sand filter, many swimming pool owners feel that it’s worth the extra money. Cartridge filters remove more dirt and debris than sand filters, and they don’t require backwashing. Instead, you simply remove the cartridge when it becomes too dirty and hose it off.

Here are a few tips to get the most out of your cartridge filter:

  • At the minimum, you should expect to do a deep cleaning twice a year. Depending on pool size and usage, you might want to do it more often. Check with your local pool professional.
  • To avoid 12 hours of filtration “downtime,” consider buying a second cartridge so you’ll have a spare when it’s time for cleaning.

Diatomaceous Earth (DE) Filters – DE filters are similar to sand filters and operate in much the same way. Like a sand filter, a DE filter requires backwashing when the pressure gauge rises. However, unlike sand filters, DE filters only need to be backwashed a few times a year. What’s more, DE filters are also the most expensive of the three – but they also offer the best filtration capabilities, superior to both sand and cartridge filters.

Additional care and maintenance considerations include:

  • To remove build-up, you should deep-clean your DE filter grids at least once every season using filter cleaner.
  • Once a year, you should disassemble your DE filter for a deep cleaning and inspection to look for damage such as tears or rips in the grids.

How to Make Your Pool Crystal Clear Again

Keep Up with pH and Chlorine Levels

Do you have a water testing device in your supply kit? If not, you might want to add it to your arsenal as soon as possible. Keeping up with the chemicals in your pool is the first step to maintaining crystal clear water.

Test the water a couple times a week and take note of what you find. Ideally, the chlorine levels should be at 1 to 3 parts per million and the pH levels at 7.2 to 7.6. Maintaining these levels helps to avoid cloudiness and bacteria growth.

Run That Filter

It’s recommended that you run your filter for 8 to 10 hours a day when using your pool. Doing so keeps the water fresh and healthy. Without regular filter use, the water will grow stagnant, and bacteria will flourish. That means you’ll spend a lot more time scrubbing and cleaning than swimming and laying out.

Skim, Skim, Skim

Yes, something that simple can be the trick to clear water. Skimming the top of your pool only takes a few minutes but is totally worth it.

What makes skimming so effective? When you skim the water, you remove all that organic material lying around. Leaving that material in the water allows it to break down and cloud the water. Do this once a day for best results.

Shock the Pool Once a Week

As you keep up with chlorine and pH levels, don’t forget to shock your pool once a week during the summer. This treatment kills any bacteria or algae that are hanging around. If you’ve noticed a lot of algae growth, follow up with algaecide

Easy Steps in Pool Water Testing without Kit

You may not know it, but your chemistry teacher has taught you an important skill for any pool owner: how to test pool water without a kit. Remember those experiments on acids and bases? Who knew that would come in handy when you run out of test kits, huh? The following method works whether you have an in-ground or above-ground swimming pool. That said, let’s get started.

1. Gather Your Materials

Pool test kits are composed of indicators or chemicals that indicate an imbalance in your water. So the objective here now is to create your indicator (a.k.a. “red cabbage juice indicator”) using the following items so that you can do pool water testing without a kit.

  • Red cabbage
  • Clear glass bowl and glasses
  • Pot or kettle
  • Kitchen knife
  • Distilled water
  • Wooden spoon or ladle
  • Strainer

2. Prepare the Red Cabbage Juice Indicator

First, you’ll need to cut up or slice the red cabbage into small strips or pieces. After that, put the sliced cabbage into a clear glass bowl and put it aside.

In a pot or kettle, boil about two cups of distilled water. Once it boils, pour the water into the glass bowl with the cabbage until the cabbage is submerged.

Stir the solution with a wooden spoon or ladle occasionally then set it aside. After about 30 minutes, get at strainer and separate the liquid from the red cabbage. You will see that the water has now turned into a purplish red color.

3. Test Your Pool Water

Get a small amount of water from the pool using a clear container. Then, get your red cabbage juice indicator and put a few drops into the water to be tested. At this point, you will either see the color change or not.

Based on basic pool chemistry, if it changes into a red or pink color, it means that your pool water is acidic. On the other hand, if it changes into a greenish-yellow or bluish-green color then that means your pool water is too basic or alkaline. If there is no color change, then the water is balanced or neutral.

To make things easier, you can use a color chart that came with your old pool test kit. Simply match the color of the water to the color chart and you should be able to determine the pH levels of your pool water right away.

When to Test Your Pool Water

Determining how often to test your pool water can be a bit of a challenge. This is because the various chemicals you need to test for need to be tested at different rates. For the two most important readings, pH and chlorine levels, you should test weekly. However, most experts suggest testing for these readings two to three times per week.

We will discuss the frequency required to test some of the other chemicals in greater detail later in this guide. For now, just know that you should be testing the pH and chlorine levels of your pool’s water at least once a week.

Of course, beyond this regular testing, you should also test your pool water more often when it is being used more often. Also, if it has rained recently, and the pool wasn’t covered, it’s a good idea to test again before getting in the pool.

Important: You should always test your pool’s water both before and after adding any new chemicals. This is to ensure your safety and proper chemical balancing of your pool water.

Protect Your Health With Mold Remediation

Toxic Mold Remediation Company Tricks to Avoid

If you have actually experienced a flood or other type of water related damage, you might find yourself worried about the possibility of mold growth and the health dangers connected with it. Although there are credible business that concentrate on mold cleaning and remediation, there are also those that use the worry of toxic mold contamination as a way to perpetrate rip-offs. These kinds of rip-offs typically cost 10s of countless dollars and sometimes, individuals have in fact lost their houses as a result. Here are some common signs of a possible mold removal fraud and suggestions on how to prevent them.

1) They provide you complimentary mold screening

Trustworthy mold remediation business charge for their services and utilize independent testing labs or a licensed commercial hygienist (CIH) to perform air and/or surface testing for mold. Anybody in the mold remediation service that provides to perform mold inspections free of charge, may be using this chance to fabricate incorrect test results that program alarmingly raised mold spore counts or the existence of hazardous black mold such as Stachybotrys. The fear of hazardous mold contamination is the most common tactic scam artist use to develop extremely pricey mold remediation jobs.

2) The same business provides to do the mold testing and removal

This is another tactic that gives unscrupulous mold removal companies an incentive to discover mold. Mold testing and assessments must constantly be carried out by independent labs or hygienist’s that have no individual or monetary interest in the results.

3) They provide a final air quality clearance free of charge

Remember, the health and welfare of you and your household is on the line, so be sure to have an independent screening lab or CIH carry out the final clearance which it passes, before you spend for removal work.

The final action in the mold elimination procedure is a post-remediation survey known as a last air quality clearance test. Check the mold inspection Tampa service. If you permit a remediation company to evaluate their own work, you will have no method to tell if the work was done effectively or if the test results are factual. An unethical removal company will not fail their own tests and they definitely will not want to incur the expenses to re-clean your house if their clearance test fails.

Do-it-yourself Mold Remediation: 3 Steps For Your House Clean-up

Mold is undesirable in the home. It darkens the corners of the bathroom, stains the walls, grows in between tiles. It’s a very unpleasant sight which feeds and rots damp wood. Mold can accumulate and can be hard to remove over time. Aside from it being a disgusting sight, different types of mold also cause respiratory diseases and is generally bad for our health. Mold releases spores that can cause allergic reactions. These allergens may be invisible to the eye but can cause serious health problems. Hiring a professional may be costly, that’s why it’s important to know these Do-It-Yourself Mold Remediation steps so you can perform the cleaning by yourself in your own home.

Get the right cleaning products

A DIY mold remediation product that mold specialists usually recommend is borax – a white powder which you can purchase from the grocery, at the detergent or laundry section. To clean mold using borax, mix the powder in one gallon of hot water. Apply the solution on the surface affected by mold and scrub the area with a rug or brush until the mold disappears. There’s no need to rinse it off because borax will keep the mold from coming back. However, do not use this cleaner on porous surfaces like drywall. Such materials absorb water easily. This could aggravate the problem because as you know – mold loves moist environments. Some other safe yet effective products you can use to kill mold are baking soda, vinegar, Tea tree oil, hydrogen peroxide, and detergent. If you’re using vinegar, simply put it in a spray bottle. No need to add water. Spray the vinegar on the surface and leave it for an hour.

Wear the right clothing

Make sure you are properly geared before you start with your DIY mold cleanup. Wear gloves, goggles, and loose clothing especially if you’re using a chemical. After cleaning the mold, dispose of your clothing and gears or thoroughly wash them. Mold spores can easily spread within your house as they travel through the air. When it comes to black mold removal, it is better to ask professionals to do it. Black mold is a dangerous type of mold and can have a hazardous effect on your health.

Dry the surface

The last and most important part of how to remove mold is drying the surface. Take note that moisture is the main cause of mold build-up. These fungi love the humid, damp environment. Since you will be cleaning mold with water, the surface will be wet for a period of time. Aim to speed up the drying process by ventilating the area. Open doors and windows if possible and run a dehumidifier. You can also use air movers to quickly dry the surface.

How to Eliminate Moisture

Mold and mildew grow best on porous surfaces because porous surfaces have the ability to hold moisture for long periods of time. In order to effectively remove moisture from a porous surface, you will need to use a concentrated approach, since towels and cloths will not do the trick. For damp surfaces, turn on a dehumidifier, which draws out the moisture. For extremely wet carpets, use a wet/dry vacuum, which you can rent at some home improvement stores. For movable surfaces such as clothes and furniture, use sunlight outdoors. For other surfaces, try using a space heater or hair dryer.

Here are 3 household solutions for cleaning mold:

  • Hydrogen Peroxide

Hydrogen peroxide is an anti-fungal, anti-viral and anti-bacterial solution that kills mold effectively on a variety of materials such as kitchen appliances, bathroom fixtures, floors and walls.

To kill mold: Pour 3% concentration hydrogen peroxide into a spray bottle. Saturate the moldy surface completely and leave it to sit for 10 minutes.

Next, scrub the area to remove all of the mold and mold stains. And finally, wipe the surface down to remove residual mold and spores.

  • VinegarVinegar is a mild acid which can kill 82% of mold species. (Baking soda is often used along with vinegar for killing different species of mold).

To kill mold: Use white distilled vinegar and pour it into a spray bottle without watering it down. Spray the vinegar onto the moldy surface and leave it to sit for an hour. Finally, wipe the area clean with water and allow the surface to dry. Any smell from the vinegar should clear within a few hours.

  • Baking SodaBaking soda is a mild, white mineral powder, that can be used to kill mold in your home, plus it is safe for your family and pets. Besides killing mold, it will absorb moisture to help keep mold away.

To kill mold: Add one quarter of a tablespoon of baking soda to a spray bottle of water and shake until it has dissolved. Spray the moldy area with the baking soda and water solution, then use a scrub brush to remove all the mold from the surface. Next, rinse the surface with water to remove any residual mold on the surface.

Finally, spray the area again and let the surface dry. (This will kill any left-over mold and prevent the mold from returning).

Can You Sell A House As-Is With Mold?

You can sell a house as-is with mold, however you must disclose. When in doubt, just disclose! Make sure you do so in writing. This will help relieve you of potential liabilities, however if you’re in doubt make sure to contact a professional. When selling a house with mold as-is, the most likely buyer will be a cash buyer. Lenders typically will not lend on houses with mold.

Spotting Mold

If you see black spots developing on a wall in a poorly ventilated room, for example, you are probably noticing the beginning stages of a mold problem.

Mold is all around you, generally in airborne spores searching for an ideal place to land and develop. In small amounts it is not a problem, but when it finds a moist place in your home and you fail to notice it, it can quickly develop into a serious problem.

Lower Price

Undoubtedly, a buyer will lower their price, often substantially, if mold was discovered. Most of the time, buyers just revoke their offer.